6.5.1 Connecting to File
Connect-to-File
Data Connectors build connections between an Origin worksheet/matrix and a data file on your PC or local network. Many common file types are supported.
For a summary of key differences between Connectors and older import methods, see FAQ-1020 Is there a difference between Connect and Import?.
 | 'To add new plot types by Add New menu,
Connectors for additional file types can be added by choosing the Add New... menu item at the bottom of the Data: Connect to File menu. This opens the App Center to show only uninstalled Connectors. Click the Download and Install icon to install the Connector App on your PC.
Alternately, go to the Origin File Exchange on the OriginLab website and select a Connector from the list. On the App page, click the Download File button and when the download completes, drag the file to the Origin workspace. For App documentation, see the App page's Description section.
To customize Connect to File menu,
You are allowed to customize the Data : Connect to File menu by selecting Data : Connect to File : Customize...
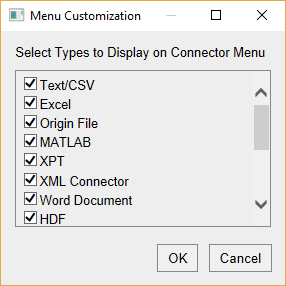
All installed data connectors will listed here, you can use the check boxes to decide which ones of them will show under the Data : Connect to File menu.
|
Adding a Connector to the Book
To add a Data Connector to the book and import data:
- With a worksheet/matrix active, choose Data: Connect to File: Data Type.
- Select the desired data file from the Open dialog box.
This opens a Connector-specific dialog box where you can configure your import options.
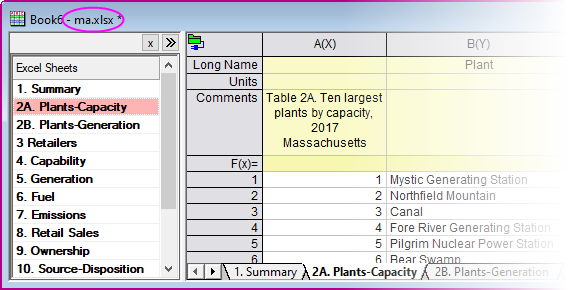
- For multi-page files such as MS Excel or MATLAB, you will choose an initial sheet to import (e.g. Excel Sheet). Upon import, a collapsible Data Navigator panel is added to the book giving you access to the files remaining sheets.
- The name of the connected file is added as the book Long Name (does not apply to CSV or Origin files).
- When connecting matrixbooks to files, Image Mode and Image Thumbnails/Slider are automatically enabled when the number of imported matrices exceeds the value of system variable @MSS (default = 10). Does not apply to Origin files. For information on changing the value of a system variable, see this FAQ.
Text/CSV Connector
Use the Text/CSV Connector to import text files such as CSV, TXT, and ASC.
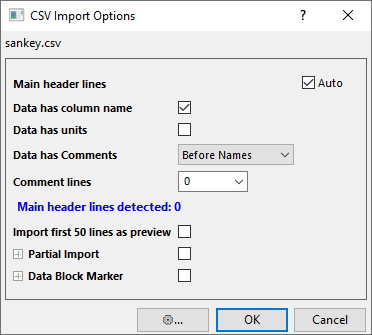
- The Import Options dialog is not opened by default since the default settings can import files correctly in most of the case. To open the Import Options dialog, check Show Options dialog checkbox in the CSV Connector dialog.
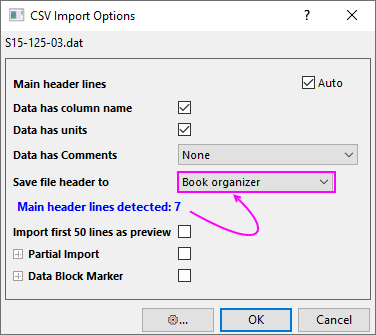
- Auto determine Main header lines or clear the check box and specify the main header and the sub-header, including column Long Name, Units and Comments, manually. Hint: a blue hint will show the number of auto-detected Main header lines.
- When main header lines are detected or manually specified, the import dialog shows a Save file header to drop-down list with options to save the file header to the Worksheet label area or the Book organizer.
| CSV Import Options
|
CSV Import Options, Main Header Lines
|
|
|
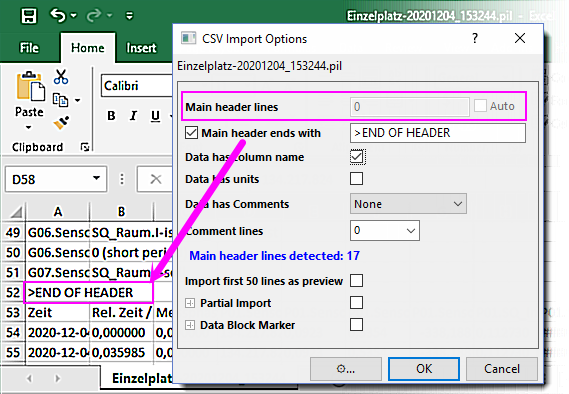
- If the imported file (some *.pil files for example) has separator line to split header and data part, something like ">END OF HEADER", uncheck Auto next to Main header lines, enter 0 for Main header lines, check Main header ends with checkbox and enter the defined separator text in the combo box.
- You can opt to Import first 50 lines as preview or for partial import.
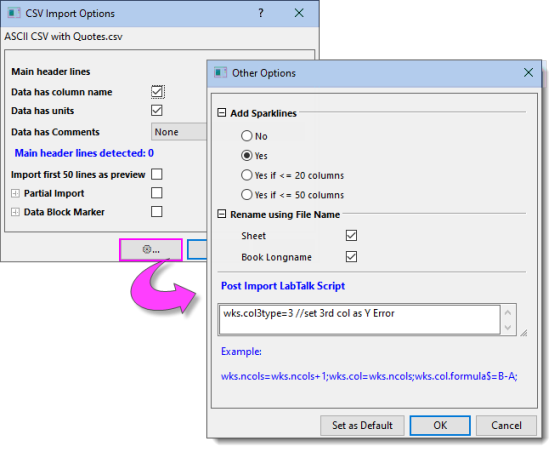
- Click the Other Options button (to the left of OK) for more options:
- Add Sparklines: Enable sparklines on import. To disable sparklines on import, set @IMPS = 0.
- Rename using File Name: CSV only. Options for Sheet and Book Long Name.
- Set as Default: CSV only: Button for setting Sparklines and Rename using File Name settings and Post Import LabTalk Scripts as default.
- Post Import LabTalk Script: Run script for post-processing of data on import. Note that the scripts will also be saved as default settings if you click Set as Default button.
| Post Import LabTalk Script can be used to extract variable from data cells ()rather than header rows. See an example in the next section.
|
- You can sort the whole worksheet by a selected column (right-click and select Sort Worksheet) after importing data by CSV Data Connector.
- If you want to import multiple CSV files in to the same worksheet and append them by rows, you can use LabTalk scripts to do it. Please refer to "EX2" on this LabTalk document page.
Extract variable from data cells
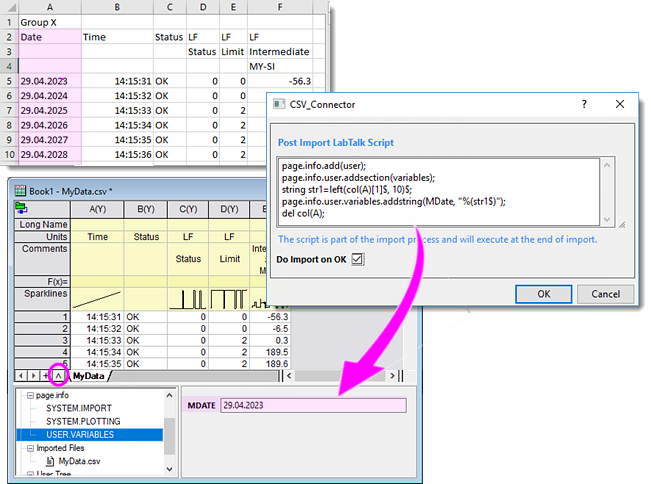
To extract information from a data cell and store it in a worksheet variable, you can use Post Import LabTalk Script dialog.
In the following example, the first column contains the experiment date and we want to extract it to an user-defined variable. We can run the below post import LabTalk scripts to add a string variable "MDate" in the sheet level and assign the first cell value to it.
page.info.add(user);
page.info.user.addsection(variables);
string str1=left(col(A)[1]$, 10)$;
page.info.user.variables.addstring(MDate, "%(str1$)");
del col(A);
After import, you can check this variable, "MDate" in the Workbook Organizer.
Data Block Markers
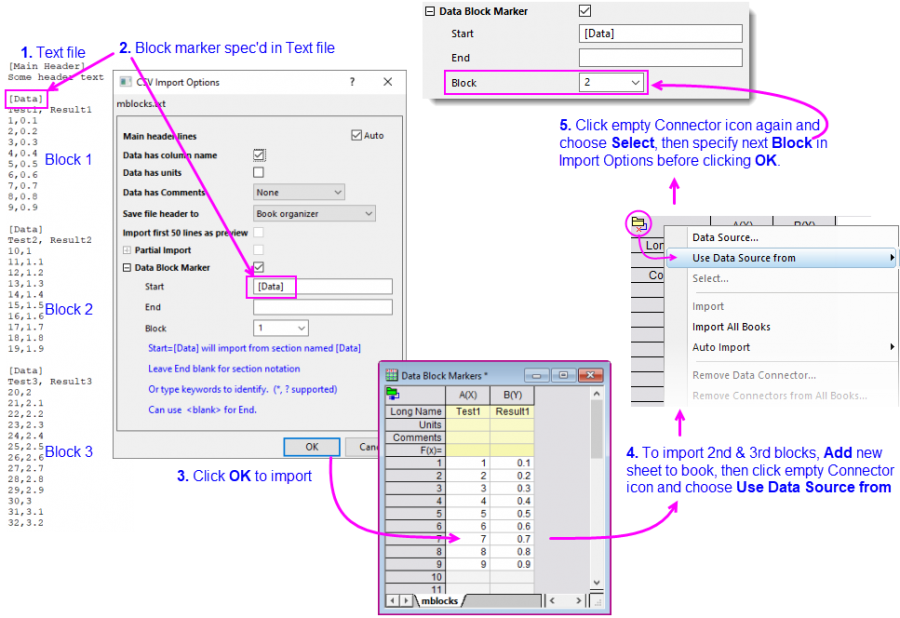
If your file is a mix of data and non-data, you can define those characters which delineate data blocks:
- Use the Start box to define the sequence of characters which mark the start of your data. If that sequence of characters uses section notation (i.e. is enclosed in square brackets as in [Data]), then End should be left blank.
- When using section notation, make sure Main header lines = Auto.
- Support for asterisk ("*") wildcard (e.g. "-*" will look for dash string of any length).
- When a blank line marks the end of the data block, you can specify End = <blank>.
Customize File Extensions
You can customize the file extension settings in the CSV Connetor, which will show in the File Type drop-down list on the file browser when you open the connector.
To customize file extensions:
- Activate Connectors tab of App Gellary docked at the right side of Origin workspace.
- Right click on the CSV Connector icon and select Customize File Extensions.
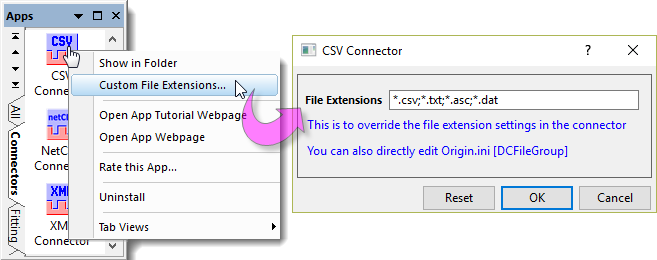
- Extensions are separated by ";".
- Click Reset button to reset to the system default file extension settings.
- You can also edit the file extension in Origin.ini file.
Excel
For information on the Excel Connector, see Importing from Excel.
JSON/XML
The Data Connector Browser dialog will open.

The upper panel loads the structure of the imported file.
- Click on one branch to view the meta data in the right panel.
- Choose the desired branch and click the down arrow to add it to the lower panel.
- Click OK button to connect and import selected data.
- If your file contains multiple arrays, variables, etc., use the Data Navigator to connect to additional data, as needed.
Tips...
- When connecting to MATLAB, JSON and NetCDF files -- either local files or web files -- custom sheet names will be kept when reconnecting to your data file (Import or Import All Books from the Data Connector menu
 ). This applies only to file types that use a tree framework and does NOT apply to other file types such as Excel or Text/CSV.
- The metadata from imported JSON/XML/Preship XML file will be stored in Workbook Organizer. To view metadata, click ˅ button at the left-bottom area of worksheet to turn on Organizer panel. To insert metadata to worksheet label rows, right click the desired tree node in Organizer and select Copy Node Path, and then go to the column label cell, right click and select Paste Link.
MATLAB
The Data Connector Browser dialog will open.

The upper panel lists all variables in the import file as a tree. There is a column on the right of each variable to indicate where each variable can be imported. Options include Worksheet, Matrix sheet or both.
- Choose the desired branch and click the down arrow to add it to the lower panel.
- If a workbook is active and the file must be imported to matrix, a dialog will popup for you to choose

- Use a new Matrixbook - this is the most straightforward way.
- Use an embedded Matrixbook - this will import data into matrix but the matrix is embedded as a sheet in workbook.
- Worksheet Columns (can be slow) -- this will import each time frame of matrix into multiple columns so it can create a worksheet with many many columns and cause slowness if data is big.
- Choose desired option and click OK to import the data.
- If your file contains multiple arrays, variables, etc., use the Data Navigator to connect to additional data, as needed.
HDF
The HDF Connector can be used to import HDF5 (.h5, .he5, .hdf5) or MATLAB's version 7.3 mat files stored locally or on the web. For more information, see this OriginLab File Exchange page.
Note that when you initiate a connection to a file, the Data Connector Browser opens, listing all variables in the file as a tree. There is a column on the right of each variable to indicate where each variable can be imported. Options include Worksheet, Matrix sheet or both, as shown in the following diagram.
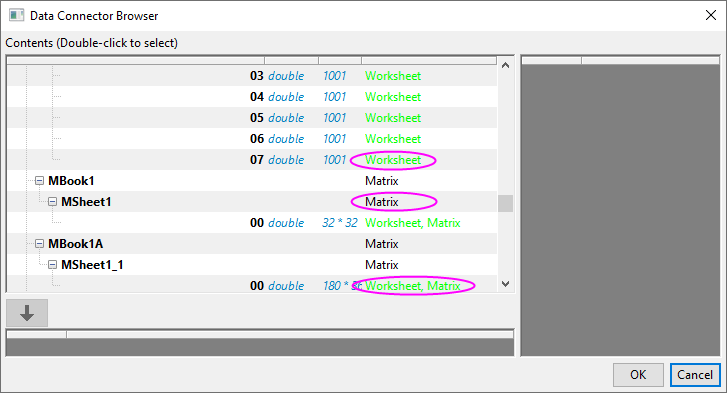
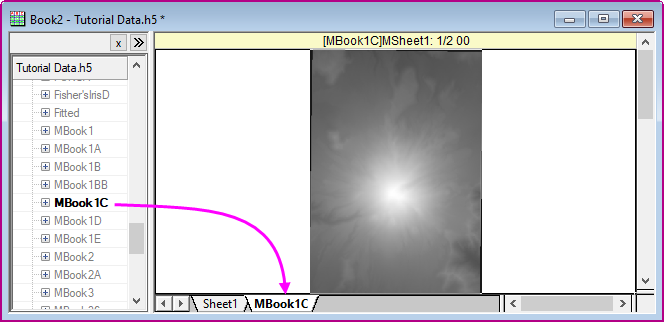
You can connect directly to any node in the file. If a worksheet is active and the variable is marked with Matrix, you will be prompted to import the node to a matrixbook. However, you can opt to import the matrix data into a workbook and Origin will automatically add the node as a matrixsheet in the active workbook.
If you connect to the root of the file, the Data Navigator opens, allowing you to selectively connect to individual nodes. As mentioned, if the data are compatible with the active sheet, they are imported into the sheet. If another sheet type is needed, it is added to the active book.
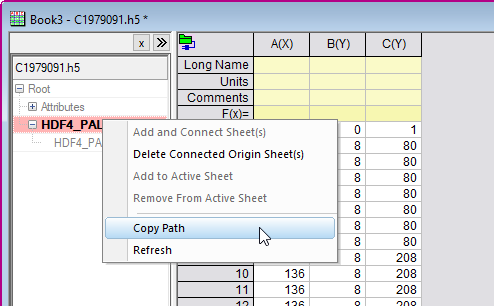
Tips for HDF Import
- As with other complexly-structured files (incl. NetCDF), there is a Navigator panel shortcut menu. The HDF Connector has one unique entry -- Copy Path -- that may interest those who are scripting data import. As copying a path deep within a complex tree structure is difficult, you can click on the entry and Copy Path.
- When scripting import with HDF Connector, you can significantly speed up the data import by not showing the Navigator panel. This you can do by adding an argument ("1") when adding the Connector.
wbk.dc.add("HDF", 1);
TDMS
Origin's TDMS Connector can be used to import data from .tdm and .tdms files.
To import a TDMS file:
- Open a new workbook and choose Data: Connect to File: TDMS. Choose a file and click Open.
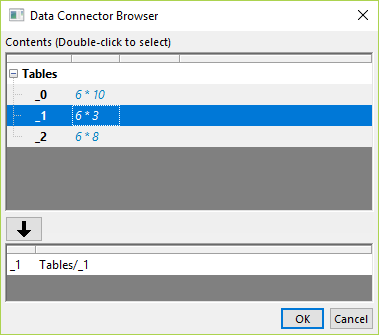
- In the Data Connector Browser, double-click on a node; or select it in the Browser and click the Select data to import button. The node is added to the bottom panel. Note that you can modify the connection string to do a partial import.
- Click OK to import data.
If you have opted to import all nodes (by selecting TDMS at the top of the Browser), each channel will be imported into a separate sheet named as the channel. Metadata will be added to each column (Long Name, Units, etc., including into a user-parameter row labeled as node_source_attributes). Sheets are named as the channel and the file name is added as book Long Name. If you opt to Import All Groups to Same Worksheet, attributes are saved to the column label row area but the sheet name is not changed.
Possible topics of interest:
N42
Origin's N42 Connector is used to import data generated by various radiation instruments.
To import an N42 file:
- Open a new workbook and choose Data: Connect to File: N42. Choose a file and click Open.
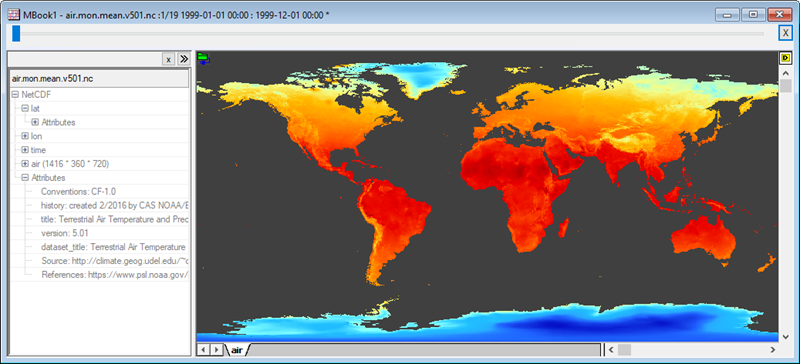
NetCDF
The NetCDF file is a self-describing, scalable format for storing arrays of variables. Designed as a flexible format for exchange of scientific data, it is readily adaptable to geographic studies and is widely used in atmospheric and climate science. Starting with version 2021b, Origin's NetCDF Connector has been improved to handle the kinds of datasets used in geographic-based studies.
In addition to such things as partial import (specify a date range, read/skip or averaging), longitude conversion, flipping latitude and specifying a sub-region by lat and lon, and an option to transform matrix values on import, the user will find these tools helpful:
- Import to Origin matrixsheet with option to view object thumbnails or scroll objects with slider.
- Data Navigator panel for imported matrix, with access to file metadata.
- Tools for analyzing and manipulating matrix data: pixel extraction, linear fit, descriptive statistics, subtraction, transpose, etc.
- Tools for extracting sub-regions from the matrix: pixel extraction, extract as xyz, crop, export region-of-interest, etc.
- Image Plots using standard or custom color palettes. Palettes can now be added to Origin by drag-and-drop.
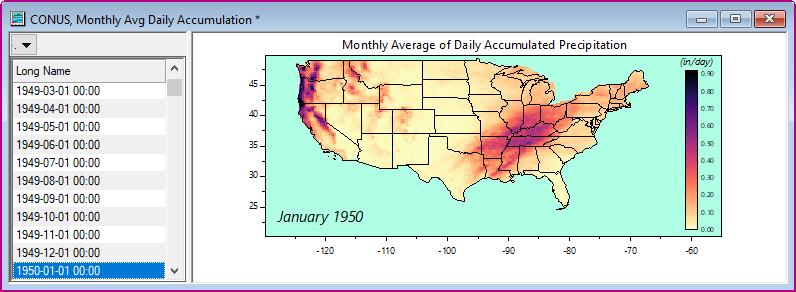
| When working with map data, activate an Image Plot, click the Insert menu and insert map boundaries for Continental USA or World.
|
To import a local .nc file:
- With a workbook or matrixbook active, choose Data: Connect to File.
- Continue with Data Connector Browser, below.
To import web-stored .nc data by specifying a URL:
- With a workbook or matrixbook active, choose Data: Connect to Web.
- In the dialog that opens, set File Type to NetCDF (optional) and either (a) click on Recent URLs and choose a .nc file from the list or (b) directly enter a URL in the text box (e.g. https://psl.noaa.gov/thredds/fileServer/Datasets/cpc_us_precip/precip.V1.0.1948.nc), then click OK.
- Continue with Data Connector Browser, below.
Data Connector Browser:
- Select the multi-dimensional variable (e.g. time * lat * lon) that you want to import and click the Select data to import button, adding the data to the bottom panel. If a workbook is active and the file requires a matrixbook, you will be asked if you want to (a) open a new matrixbook, (b) embed a matrixbook in the active workbook, or (c) import data to worksheet columns. Typically, single-dimensional variables should be imported into workbooks while multi-dimensional variables should imported into matrixbooks.
- Click the Import Options button (the "pencil" icon) and choose your options. Here, you can specify a partial import, convert longitude or flip your matrix vertically, or transform data using a formula.

- Click OK to close Import Options and click OK again to close the Browser and import your data. Large files may take some time to import. When the file is imported a Browser panel is added to the left side of the matrix. Note the slider at the top of the matrix window for viewing individual matrix objects.

| Once a file is imported, you can make changes to Import Options by clicking the Connector icon and choosing Options.
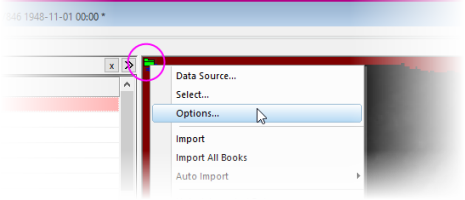
|
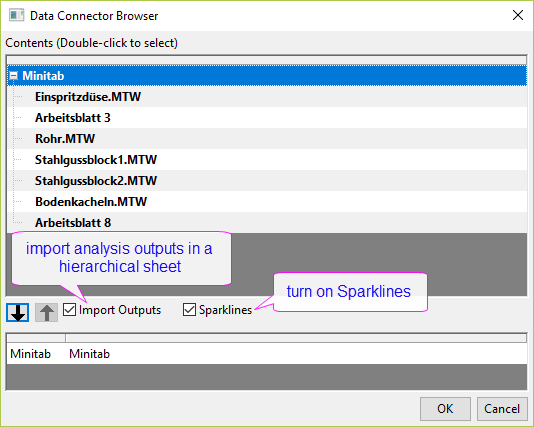
Minitab
- To connect to a local file, select Data: Connect to File: Minitab.
- On the browser dialog to select the sheet(s) to import, there is an Import Outputs checkbox, allowing you to import the analysis results in the file. If checked, the analysis outputs will be imported into a hierarchical worksheet "OutputsHier". The Minitab outputs will be organized in a tree structure, with sheet name as node and expand it, the analysis results listed in the table.
Shapefile
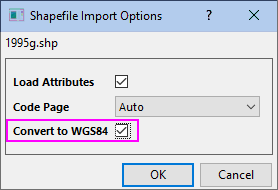
- To connect to a local file, select Data: Connect to File: Shapefile. To connect to web data, select Data: Connect to Web and enter the URL.
- Shapefile Connector will open a simple Import Options dialog. You can select the Load Attributes checkbox to import the columnar attributes for each shape. Columnar attributes is a .dbf file having the same name of the .shp file and saved in the same folder. Convert to WGS84 check box converts shapefiles with distances in meters, to the WGS system with longitude and latitude.
- After import, you will see at least 3 columns in the worksheet: X, Y and Feature ID. X and Y coordinates are separated by missing values to represent different segments. Multiple segments may share one Feature ID.
For more information, see Shapefile Connection page in File Exchange.
Origin File
The Origin Connector imports data from an Origin project (opj(u)) or workbook (ogw(u)) file. This allows you to use Origin files as a data repository.
When connecting to data in an Origin file -- whether it be a project file or a multi-page workbook -- the Data Connector Browser opens. Here, you can selectively pick the data that you want to import. Once you have added a Connector to the workbook, you can import other worksheets as needed by right-clicking on a column in the Data Navigator and choosing Add and Connect Sheet(s).
Additionally, beginning with Origin 2020, the Origin Connector supports an SQL-like query language for searching and extracting the desired data from your Origin files.
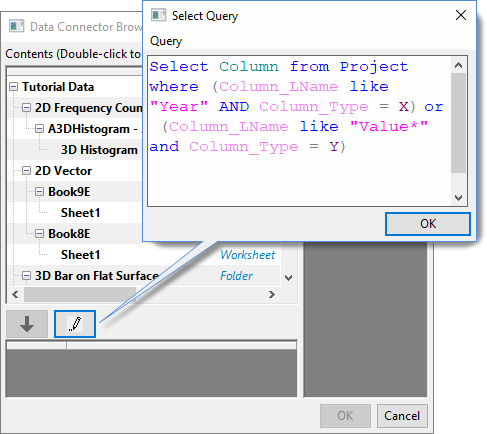
- In the Data Connector Browser dialog, click Select Query button
 to open Select Query dialog.
- Enter query strings in the edit box to, for example, search in the entire project and pull all the columns with the specified LongName and plot designation.
- Clicking OK button will add the query to the lower panel. Click OK again to import columns that meets the condition to a new workbook.
- In addition to query capabilities, you can use the Data Navigator to connect to additional sheets in the Origin project, as needed.
HTML Table
The Data Connector Browser dialog will open.
The upper panel loads all the tables on the web page. Choose the desired table and click the down arrow to add it to the lower panel. Click OK button to import.
Google Sheet
Several ways to import Google sheet:
- Click Google Sheet app icon
 in the App Gallery > Connectors tab. A message dialog opens asking whether to open from a Google sheet URL or not.
- Select Yes to open the Connect to Web dialog and enter a Google sheet share link.
- Select No to open the Google Drive browser and select a Google sheet.
- Select menu Data: Connect to File: Google Sheet to select a Google sheet from Google Drive browser.
- Select menu Data: Connect from Cloud or click the Open From Cloud button
 on the Standard toolbar to select a Google sheet from Google Drive Browser.
Connect Multiple Files
Use this menu to connect to multiple files of identical file type and structure.
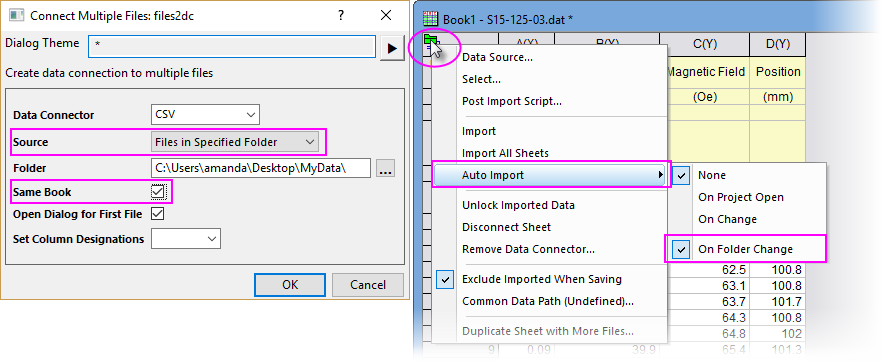
- With the workbook or matrixbook active, choose Data: Connect Multiple Files. This will open the files2dc dialog.
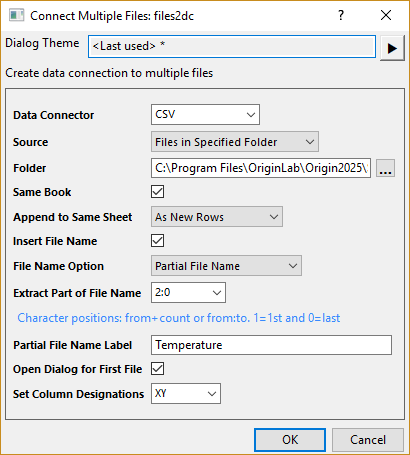
- Same Book is availble for connector type that supports importing multiple files in the same workbook, CSV Connector for example. Checking this checkbox means that the book is named with the name of the first file. If imported to separate books, each book will be name with the file name.
- For CSV files,
- selecting from Append to Same Sheet drop-down list, you can chosse to import each file to a separated sheet (None), import all files in the same sheet appending by rows (As New Rows) or by columns (As New Column).
- when Append to Same Sheet = As New Row, you can check Insert File Name to insert a column to the very beginning to store the file name information. Specify File Name Option and Extract Part of File Nmae options below to determine what information you want to extract from file name.
- when Append to Same Sheet = As New Row/As New Column, you can choose from File Name Option drop-down list to specify what information you want to extract from the name: File Name Only, both Name and Extension, or Partial File Name and then specify which part of the name to extract in Extract Part of File Name edit box.
Furthermore, you can specify the file name column Long Name (for As New Row case) or label row header (for As New Column case) in the Partial File Nmae Label edit box.
- Check the Open Dialog for First File box to adjust import settings before file import.
- Use the Set Column Designations combo box to specify worksheet column designations on import. Note that repeated patterns (pattern enclosed in parentheses is repeated) and pattern with lading and trailing designation symbols are supported.
- If you choose to import Files in Specified Folder and import them into Same Book, and turn on Auto Import: On Folder Change, when you add, remove, or update data file(s) in the Source folder later, Origin will scan the folder to reimport all data files again.
In this case, if you save the working project, the connection will be saved as relative path by default.
- If choosing Data Connector = Import Filter, see the next section.
Import a File with Filter
This option lets you use Data Connectors with an import filter file (*.OIF) that you created with the Import Wizard.
When Connecting to a Single File:
- With a worksheet/matrix active, choose Data: Connect to File: Import Filter.
- Select a desired data file from the opened browser.
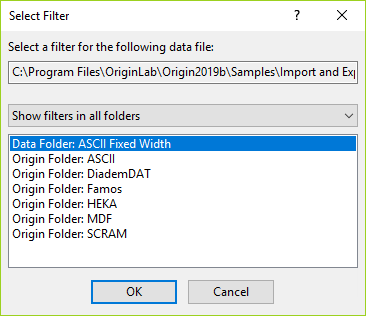
- In the Select Filter dialog, select the desired filter. Click OK to import.
When Connecting Multiple Files:
- Choose Data: Connect Multiple Files or click the Connect Multiple Files button
 on the Import toolbar.
- Set Data Connector = Import Filter.
- Choose files and decide whether you want them imported into the same book or separate books, then click OK.
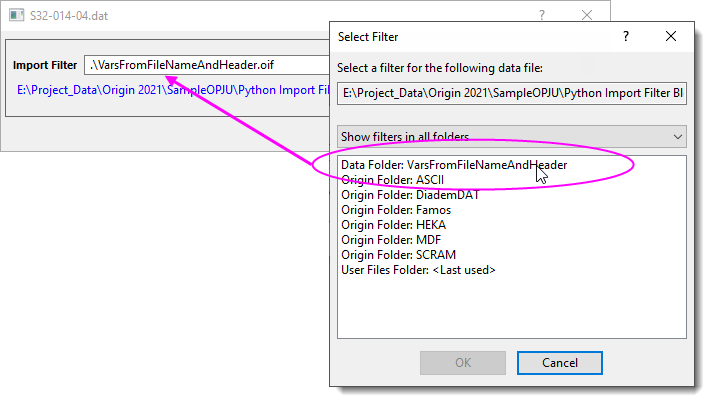
When choosing this option, there is no Open Dialog.... check box in the files2dc dialog box. Instead, an Import Filter dialog opens where you can browse to and select your import filter file.
Starting New Sheets:
As with the Import Wizard, the Import Filter Connector supports starting new sheets when non-numeric data is encountered in a numeric field.
| Notes:
You can customize file extension settings of Import Filter Connector by right click on this connector icon in Apps Gellay and select Customize File Extensions context menu. Refer to this section of CSV Connector for details.
|
Clone Import
This is another way to connect to multiple files. However, this is much more than a simple multi-file import mechanism. The real value of "cloning" is in rapidly duplicating graphing and analysis operations carried out on a prototype file, on subsequent files of the same type and structure. Once you have a prototype, cloning is trivial:
- Import your prototype data file using Data: Connect to File, then perform the desired graphing and/or analysis operations.
- With the data-containing workbook or matrixbook active, choose Data: Clone Import; or click the Clone Import button
 on the Import toolbar.
- Choose files and click OK.
See the tutorial "Importing Multiple Files into Workbooks Cloned from Active Workbook" for more information.
Connect Files by Appending Rows to Current Sheet
This method of connecting to multiple files is only supported by Text/CSV as of version 2021. Files must be appended one-by-one and will be imported by appending rows to the current worksheet.
- Use the Text/CSV Connector to import a file into the worksheet. Be sure to specify a Data Block Marker if your file uses one.
- With the worksheet active, open the Script Window (Window: Script Window), type the following and press Enter:
wks.dc.flags=256
- Return to the active worksheet and click the green Data Connector icon .
- Choose Data Source, set File Path to the file you want to append and click OK.
- Choose connection options including Data Block Marker, then click OK to import the file by appending data to the current worksheet as new rows.