2.3.1 Notes Windows
NoteWindow-Names
Opening a new Notes window
- Click the New Notes button
 on the Standard toolbar.
or
- Select File: New: Notes menu.
Controls for Notes window
The Notes main menu
When you create new a Notes window, Notes will be added to the main menu.
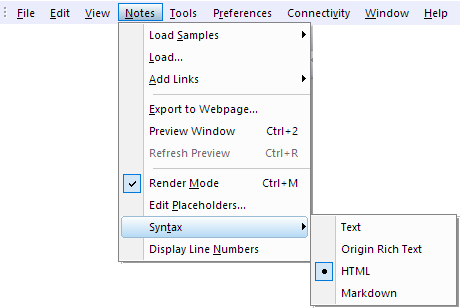
- Load Samples: Load build-in samples, including the HTML files, MD files.
- Load: Load other files.
- Add Links: Add Graphs and worksheets, cell values, tables, matrices, strings and variables to the active Notes window.
- For Text, HTML and MarkDown syntax, you can add Worksheet cell, Info Variables, Worksheet, Graph/Image, Button and Combo in the menu. Refer the syntax of links.
- For Origin Rich Text syntax, it only supports to add Worksheet cell, Info Variables and Graph/Image in the menu.
- Export to Webpage: Export current notes window as a web file, such as a html file. This item is only availiable when the Render Mode is on.
- Render Mode: Render the Origin Rich Text/ HTML/ MarkDown syntax to show the information in current Notes window in different formats.
- Edit placeholders: Edit placeholders in the HTML/MarkDown source.
- Select the Edit Placeholder to open the worksheet HTML#, then you can edit these placeholder and copy&paste cell link to insert the values which can be updated by changes in source.
- Syntax: Switch the syntax.
- You can only switch between Text and Origin Rich Text/ HTML/ MarkDown, but not between Origin Rich Text, HTML and MarkDown. To switch between Origin Rich Text/ HTML/ MarkDown these three options, you need turn back to Text first.
- Display Line Number: Display the line number at the header of the row with content.
The context menu on the window title bar
Right-click on the window title bar, you can see there are several items available to control the notes window.
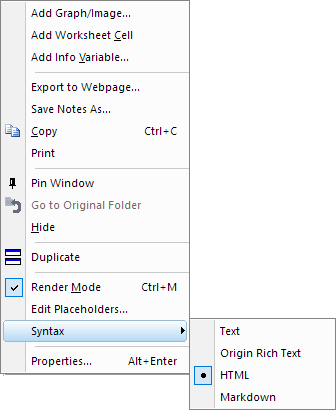
- Add Graph/Image, Worksheet cell, Info Variables: Insert these objects in the Notes.
- Export to Webpage: Export current notes window as a web file, such as a html file. This item is only availiable when the Render Mode is on.
- Save Notes as: Save current notes window as a text/LabTalk Script/html/MarkDown file.
- Print: Print current notes window.
- Pin Window: Pin the window so that the location is fixed (useful when arranging windows).
- Hide: Hide current notes window. Once hidden, the notes window can be called back by double-clicking on the gray-out icon in the Project Explorer.
- Duplicate: Duplicate current notes window.
- Render Mode: Render the Origin Rich Text/ HTML/ MarkDown syntax to show the information in current Notes window in different formats.
- Edit placeholders: Edit placeholders in the HTML/MarkDown source.
- Select the Edit Placeholder to open the worksheet HTML#, then you can edit these placeholder and copy&paste cell link to insert the values which can be updated by changes in source.
- Syntax: Switch the syntax.
- You can only switch between Text and Origin Rich Text/ HTML/ MarkDown, but not between Origin Rich Text, HTML and MarkDown. To switch between Origin Rich Text/ HTML/ MarkDown these three options, you need turn back to Text first.
- Properties: Open the Window Properties dialog to control the window name, comments and window title.
Naming and labelling the Notes window
- Right-click on the Notes window's title bar and choose Properties... Alt+Enter to open the Window Properties dialog.
- Enter Long Name, Short Name and/or Comments to name the notes window.
- Use the Window Title drop-down list to control how to show long name and short name on the title bar.
- Click OK button. Of course, you can switch to Info tab to check the detailed information of current notes window.
Controlling Font and Font Size
Use the font and font size on the Format toolbar to control font and font size in notes window.

- The font is shared among all Notes window so changing font in one Notes window will apply to all other Notes windows.
- The font size can be controlled in each Notes window independently.
- The font and font size change will be used as default for all future Notes window. To bring back the system default, close Origin, open Origin.ini under User Files folder and delete the font and size rows under [Notes] section. Save Origin.ini and restart Origin.
- Use Ctrl+mouse wheel to zoom in and out in Notes window.
- Ctrl+M to toggle render mode of Notes window. In render mode, the Zoom percentage dropdown list will be enabled on the Standard toolbar.
Turning on Text Wrap
- With the Notes window active, choose View: Word Wrap to turn on or off Text wrap.
- Press Alt+Enter to open Window Properties dialog and set Page Width. Then Ctrl+M to show text wrapping effect.
Saving the contents of the Notes window to a file
- Right-click on the title bar of the notes window to select Save Notes As; or activate notes window to choose File:Save Notes As menu.
- Choose the desired file type from the Save As Type drop-down list, enter a File Name, and Save.
Entering and rendering the HTML/MarkDown language
- New a Notes window, enter your HTML/MarkDown script into the notes window.
- Select Notes: Syntax: HTML/MarkDown menu or right-click on the title bar to select Syntax: HTML/MarkDown context menu.
- Then, choose Notes: Render Mode menu, or right-click on the title bar to select Render Mode context menu, or press Ctrl+M hotkey to render the script lines in current window. Double click on any place of window workspace or press Ctrl + M hotkey to switch between the editable and un-editable states.
|
Note: By default, the Notes window has been set to the Origin Rich Text mode.
Once you enter some script lines in a new notes window, you can press Ctrl + M hotkey to preview the format and content.
The system variable @NPS is used to set the syntax you prefer to preview the script. @NPS = 0 sets the script lines as HTML language and @NPS = 1 as MarkDown language.
The system variable @CNFS idetermines the behavior of rendered Origin Text in Notes window.
- @CNFS = 0 the rendered size in Note window was constant regardless of the Scale of the monitor and it corresponded exactly to the font size as measured on screen (like using a ruler).
- @CNFS = 1 the rendered size in Note window grows with the Scale of the monitor and it does not correspond to the font size as measured on screen.
|
Exporting the contents of the Notes window as Webpage
- Right-click on the window's title, and select Render Mode.
- Right click on the window's title bar and choose Export to Webpage..., or select Notes: Export to Webpage... in the menu
- Enter a File Name, and Save.
Notes:
- Export to Webpage menu is only available when the Notes window is currently in Render mode.
- When you export a Notes window as a HTML file, the necessary PNG files (generated from Origin graphs and get refer to in the Notes window) will get exported as well and put into the same folder as the HTML file.
|
Inserting to Workbook as a Sheet
Notes Window can be insert to a Workbook as a Sheet.
Right click the sheet tab of a Workbook, and select Add Notes as Sheet.
Previewing Notes in separate window
When Notes window in the Origin Rich Text/ HTML/ MarkDown syntax edit mode, you can press Ctrl + 2 hotkey to toggle separate preview window on to side by side viewing of the edit source and results. Press again Ctrl + 2 can toggle off the preview window.
Ctrl + R is used to refresh the separate preview window after editing raw text.
 | The preview window can be put to second monitor as floating window.
|