If you want to share your Origin work files with another user then we recommend you to use Origin's Package Manager. Similar to Zip, Package Manager packs all your files into a single file for sending to other users. But Package Manager offers other advantages. The main advantage with Package Manager is allowing other users to install the files within the package by simply dragging and dropping the package on to Origin's workspace. Packages can also be setup to create Apps, button groups and toolbars and execute LabTalk scripts before and after installation. Packages can be easily uninstalled from the Package Manager dialog.
Open Package Manager by choosing Package Manager on the Tools menu.
The Package Manger dialog has a File menu and a Tools menu.
The File menu contains the following items:
| New |
Create a new package. This will cause the current package, if one is open, to be closed. If the current package has been changed but not saved then you will be prompted to save or discard the changes or cancel the creation of a new package. |
|---|---|
| Open... |
Open an existing package file. This will cause the current package, if one is open, to be closed. If the current package has been changed but not saved then you will be prompted to save or discard the changes or cancel the opening of a new package. |
| Save |
Save the current package to disk using it's current file name. If the package is new and does not yet have a file name then you will be prompted for a file name. |
| Save As... |
Save the current package using a new file name. |
| Close |
Close the dialog. If changes were made to current package and have not been saved you will be prompted to save or discard the changes or cancel the closing action. |
The Tools menu contains the following items:
| Browse Installed Packages... |
This item will show you the Installed Packages dialog box which lists all the packages currently installed. You can browse the packages information such as name, version, and description, and open/uninstall the selected package if you wish. |
|---|---|
| Extract a Package... |
Extracting a package is different than installing a package. Extracting a package is used when you only want to get the files out of the package. The before and after scripts will not be executed. You also will be prompted to choose the target folder which can be any folder you choose. The target folder does not have to be Origin's user nor system folder. |
| Install a Package... |
You will be prompted with a file dialog to choose a package file. After choosing a package file and clicking Open button the package will be installed. |
| Uninstall a Package... |
This item will also show you the "Installed Packages" dialog box. Simply select the packages you want to uninstall and click the Uninstall button. |
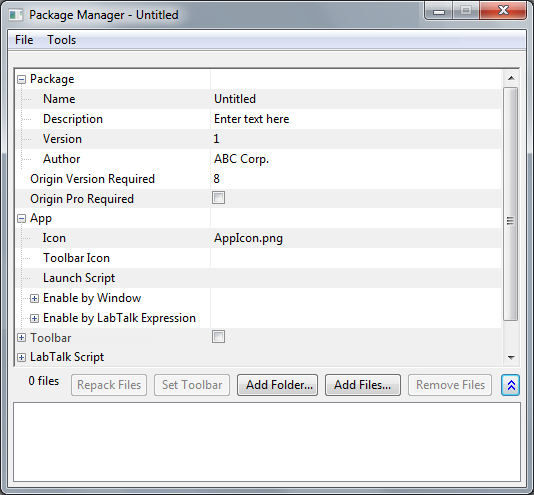
The tree view is where the package settings are edited.
| Package |
|
|---|---|
| Origin Version Required |
The version of Origin required to use the module contained in the package. The version can be specified down to Service Release version. For example, you can enter "9.32" to indicate the package requires V2016 SR2 or later. |
| Origin Pro Required |
Check this check box to restrict the module contained in the package available in OriginPro version only. |
| Apps |
|
| Toolbar |
|
| LabTalk Script |
|
| Encrypt C and CPP Files |
Check this checkbox to encrypt C and CPP files in this package if you want. |
| Source Path |
This field shows the source path for all the packed files. All files added to the package must come from the same source path. The Source Path is set when you add your first folder or file.
|
Below the tree view are six buttons.
| Repack Files |
Click this button to repack all the files that have been added to the package. This button is useful when you change a file and want to put the file changes into the package. Instead of removing the file and adding it again you can simply click this button and all the new changes to your files will be repacked into the package. This button is disabled until the package contains at least one file. |
|---|---|
| Set Toolbar |
Click this button to set the Button Group File setting in the Toolbar branch of the tree view. This button is disabled until you select a single file in the File List. |
| Add Folder... |
Click this button to add a folder and all the files and subfolders contained in the chosen folder. The Source Path field, in the tree view, will be set when adding the first folder or file to the package. For more information see Source Path. |
| Add Files... |
Click this button to add files to the package. You will be prompted with a "Add Files To Package" file dialog. The Source Path field, in the tree view, will be set when adding the first folder or file to the package. For more information see Source Path. |
| Remove Files |
Click this button to remove all the selected files from the package. This button is disabled until you select one or more files in the File List. |
The right-most button is used to show and hide the File List.
The file list shows all the files that are currently in the package. The total number of files in the list is shown to the left of the above six button. The number of files in the list and the number of selected files will change the state of the buttons as described above.
Create a new package by adding files:
Create a new package by adding a folder:
If all of the files you want to put into a package are the same folder, it is more convenient to use the Add Folder button. This will add the folder and everything inside the folder, including subfolders their contents, into the package. The folder structure will be remembered in the package and will be recreated when the package is installed by another user.
| Note:
Button Groups require that all supporting files be in the Origin folder or in a subfolder of the Origin folder. It is highly recommended that your module keep all it's files, if possible, in a subfolder to keep modules organized and to avoid cluttering either the Apps folder or the User Files Folder. |
To create a new package for an App, you can follow the steps in this tutorial.
You can extract the files from an existing package using the Package Manager.
All the files will be extracted to the target folder. If the package contains subfolder information then all the subfolders will be created and files will be extracted into the subfolders just as they were when they were added to the package.
| Note:
Extracting files from a package is not the same as installing a package. When extracting files from a package, Button Groups and Toolbars are not created and LabTalk scripts are not executed. Toolbar information and LabTalk scripts are only used when the package is being installed or uninstalled. |
Installing A Package Using Package Manager
The package will be installed.
Installing A Package Using Drag & Drop
The package will be installed.
Installing A Package Using Group Folder
If you are using a concurrent network then you can have your package installed on all clients by putting it into your Group Folder.
Please see Group Folder Manager for how to do this.
Silent Install
A silent installation means performing installing automatically with the least user intervention. It is very useful when the installing procedure contains so many rollout messages that it would cost user many time to respond to every message and make the installation much slower.
To make an OPX that can be silently installed you need to have the following settings:
doc -s;
exit;
After making the necessary changes to the OPX it is now possible to launch Origin, install the OPX, and exit Origin without any human interaction. The following command line demonstrates how to perform the silent install of the OPX.
Origin64.exe -h -R "instOPX OPXFileName.opx"
The above command line will need to be edited to use the file name of your OPX.
Note:
|
You can uninstall a package already installed using Package Manager.
The package will be uninstalled from your computer.
The Package Manager is handled by OriginC code in OriginC\OriginLab\XMLPackage.c
The XMLPackage.c file calls a collection of Origin exported functions for working with packages. The following functions are declared in oUtils.h and exported from Origin's okUtil80.dll:
See OriginC's oUtils.h for the function's return type and the argument accepted by each function.
Every Origin C file, when compiled, will generate a corresponding .OCB file in your User Files Folder. The .OCB file prevents having to recompile your Origin C source code every time it is executed. If you distribute Origin C files using an Origin package then you want to be sure your changed Origin C file gets recompiled when a user installs your updated package. In other words you want to delete the .OCB file that was created on the user's computer when they installed an older version of your package. You can delete the .OCB files using LabTalk's Delete command with the OCB option in your package's After Installation script.
For a detailed description of doing this please see Updating an Existing Origin C File
Make an OPX file from ini settings without opening package manager dialog. This will be useful if user execute origin from command line or a windows BAT files.
#include <Origin.h>
#include <../OriginLab/OPXFile.h>
int test_ini_to_opx()
{
	OPXFile opx;
	int err = opx.InitFromIni("opx_IEVer.ini");
	if( err == 0 )
	{
		if( !opx.Save() )
			printf("Failed saving.\n");
	}
	else
		printf("InitFromIni error %d\n", err);
	return 0;
}
mkOPX ini:="C:\Users\jacqueline\Documents\OriginLab\User Files\opx_IEVer.ini" app:=Custom_IEVer opx:=H:\CustomIEVer.opx;
| Note:
This method require a source ini file which including all settings in package manager dialog. See below, opx_IEVer.ini, for example: |
[Package]
Name=IEVer
Description=Show IE version detected by Origin
Version=1.0
Author=OriginLab

[Origin]
Version=9.4
Pro=0

[App]
Icon=AppIcon.png
ToolbarIcon=
LaunchScript=run.section("%@AIEVer\IEVer.ogs",main);

[AppEnable]
Always=1
Graph=1
Workbook=1
Matrixbook=1
Image=1
Excel=1
Layout=1
LabTalkExp=

[Toolbar]
ButtonGroupFile=
Create=0

[LabTalk]
BeforeInstall=
AfterInstall=
BeforeUninstall=

[Files]
EncryptC=0
SourcePath=C:\Users\eparent\AppData\Local\OriginLab\Apps\IEVer\
OPXFile=IEVer1.opx