1.1.7 Creating Wizard Dialog
X-Functions support wizard dialogs. To create a wizard dialog, you need n+1 X-Functions, where n is the number of wizard pages. One is the main X-Function. The main X-Function is used to construct wizard pages and then open the wizard dialog if script mode is off, or run without dialog when script mode is on.
Contents
Creating a Wizard
The following shows how to create a two page wizard. Page 1 is used to select an XY range, and to specify the sub x range of the selected data range. Page 2 is used to add a rectangle with the specified fill color onto the source graph. The left x and right x of this rectangle are equal to the values of x from/to in Page 1.
- Add a header file, wizDlg.h, under the UFF\OriginC\ folder. Put the following code into this header file to derive subclasses from Origin C built-in X-Function wizard classes. The X-Function basic wizard classes are:
- XFCore, which is used to save and pass values in each page.
- XFWizTheme, which is used to arrange theme settings for each wizard page.
- XFWizInputOutputRange, which is used to arrange input and output ranges for each page.
- XFWizManager, which is very important and must have a user-defined subclass derived from it. It is used to decide the steps in the wizard.
#ifndef __WIZ_DLG_H__
#define __WIZ_DLG_H__

#include <..\OriginLab\XFWiz.h>
#include <..\OriginLab\XFCore.h>

#include <..\OriginLab\WizOperation.h>
#include <..\OriginLab\XFWizNavigation.h>
#include <..\OriginLab\XFWizManager.h>
#include <..\OriginLab\XFWizScript.h>
#include <..\OriginLab\XFWizDlg.h>

#include <..\OriginLab\XFWizard_utils.h>

///////////////////////////////////////////////////////////////////////////
class WizDlgCore : public XFCore
{
public:
	WizDlgCore()
	{
	}

	void SetXRange(double from, double to)
	{
		m_dFrom = from;
		m_dTo = to;
	}

	void GetXRange(double& from, double& to)
	{
		from = m_dFrom;
		to = m_dTo;
	}

private:
	double m_dFrom;
	double m_dTo;
};

///////////////////////////////////////////////////////////////////////////
class WizDlgTheme : public XFWizTheme
{
};

///////////////////////////////////////////////////////////////////////////
class WizDlgInputOutputRange : public XFWizInputOutputRange
{
};

///////////////////////////////////////////////////////////////////////////
class WizDlgManager : public XFWizManager
{
public:
	WizDlgManager(LPCSTR lpcszThemeName = NULL,
	const XFWizTheme *pXFWizTheme = NULL,
	const XFWizInputOutputRange *pXFWizIO = NULL, DWORD dwUIDOp = 0);

protected:
	virtual XFCore*	CreateXFCore() { return new WizDlgCore; }
	virtual XFWizTheme*	CreateXFWizTheme() { return new WizDlgTheme; }
	virtual XFWizInputOutputRange* CreateXFWizInputOutputRange()
	{
		return new WizDlgInputOutputRange;
	}

	virtual string	GetClassName() { return "WizDlgExample"; }
};

#define STR_XFNAME_PAGE_1			"wizPage1"
#define STR_XFNAME_PAGE_2			"wizPage2"

#define STR_LABEL_XFNAME_PAGE_1		"Page 1"
#define STR_LABEL_XFNAME_PAGE_2		"Page 2"

WizDlgManager::WizDlgManager(LPCSTR lpcszThemeName,
	const XFWizTheme *pXFWizTheme, const XFWizInputOutputRange *pXFWizIO,
	DWORD dwUIDOp) // = NULL, NULL, NULL, 0
: XFWizManager(lpcszThemeName, pXFWizTheme, pXFWizIO, dwUIDOp)
{
	StringArray saMapXFNames = {STR_XFNAME_PAGE_1, STR_XFNAME_PAGE_2};
	StringArray saMapXFLabels = {STR_LABEL_XFNAME_PAGE_1,
				STR_LABEL_XFNAME_PAGE_2};
	m_saMapXFNames = saMapXFNames;
	m_saMapXFLabels = saMapXFLabels;
	ASSERT( m_saMapXFNames.GetSize() == m_saMapXFLabels.GetSize() );

	m_saDefaultXFNames = saMapXFNames;
}

///////////////////////////////////////////////////////////////////////////
int run_wiz_nodlg(LPCSTR lpcszThemeName = NULL,
	const XFWizTheme *pXFWizTheme = NULL,
	const XFWizInputOutputRange *pXFWizIO = NULL, DWORD dwOPUID = 0)
{
	TEMPLATE_run_wiz_nodlg(WizDlgManager, lpcszThemeName, pXFWizTheme,
			pXFWizIO, dwOPUID)
}

int open_wiz_dlg(LPCSTR lpcszThemeName = NULL,
	const XFWizTheme *pXFWizTheme = NULL,
	const XFWizInputOutputRange *pXFWizIO = NULL, DWORD dwOPUID = 0)
{
	TEMPLATE_open_wiz_dlg(WizDlgManager, lpcszThemeName, pXFWizTheme,
			pXFWizIO, dwOPUID)
}

#endif	//__WIZ_DLG_H__
- Press F10 to open X-Function Builder, to create a main X-Function as below.
 Click the
  button to save this X-Function. Close X-Function Builder.
 - Open Code Builder, open the wizDlg.OXF file and add it to the current workspace. Add the following header files after the line //put additional include files here.
#include <..\OriginLab\XFWiz.h>

#include <event_utils.h>
#include <..\OriginLab\WksOperation.h>
#include <..\OriginLab\WizOperation.h>

#include <..\OriginLab\XFCore.h>
#include <..\OriginLab\XFWizNavigation.h>
#include <..\OriginLab\XFWizManager.h>
#include <..\OriginLab\XFWizScript.h>
#include <..\OriginLab\XFWizDlg.h>
#include <..\OriginLab\XFWizard_utils.h>

#include <..\Originlab\wizDlg.h> // user added header file for this example
- Add the following code to the main function wizDlg
WizDlgInputOutputRange objXFWizIO;
if(!xfwiz_construct_input_range(&objXFWizIO, STR_XFNAME_PAGE_1,  iy))
{
	XF_THROW(XFERR_FAIL_TO_UPDATE_GETN_TREE);
}

if( script )
{
	run_wiz_nodlg(theme, NULL, &objXFWizIO);
}
else
{
	open_wiz_dlg(theme, NULL, &objXFWizIO);
}
- Press F10 to open X-Function Builder and create the X-Function wizPage1 for the wizard page 1 as below.
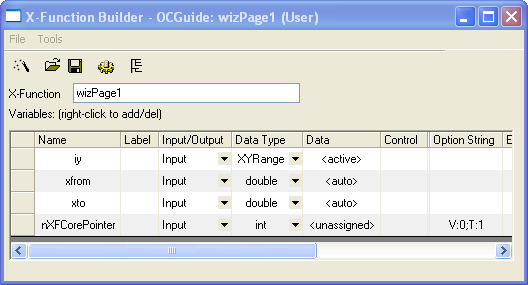
- Add the following user-defined header file after the line //put additional include files here, as below.
#include <..\Originlab\wizDlg.h> // user added header file for this example
- Put the following code into the page 1 main function wizPage1.
WizDlgCore* pWizCore =
	(WizDlgCore*)get_xf_core_handler(NODE_NAME_XF_WIZ_CORE_POINTER);
ASSERT(pWizCore);

// Set X From/To to WizCore class object
pWizCore->SetXRange(xfrom, xto);
- Add the following code to the wizPage1 X-Function _event1 function wizPage1_before_execute, to initialize the xfrom and xto controls according to the input data range.
if( PDS_AUTO == okutil_cvt_str_to_predefined_type(trGetN.xfrom.strVal)
	|| PDS_AUTO == okutil_cvt_str_to_predefined_type(trGetN.xto.strVal) )
{
	DataRange dr;
	TreeNode trRange = trGetN.iy;
	okxf_resolve_tree_construct_range(&trRange, &dr);

	vector vx;
	dr.GetData(DRR_GET_DEPENDENT, 0, NULL, NULL, NULL, &vx);

	double from, to;
	vx.GetMinMax(from, to);

	trGetN.xfrom.dVal = from;
	trGetN.xto.dVal = to;
}
- Open X-Function Builder to create the X-Function wizPage2 for page 2. Set up the X-Function name and variables as below and click the Save button to save.
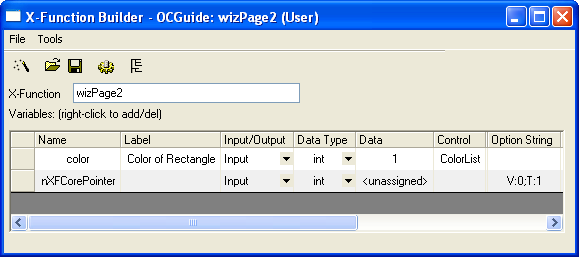
- Open the wizPage2.OXF file in Code Builder, and add it to the current workspace to include header files, as below.
//put additional include files here
#include <..\Originlab\wizDlg.h>
#include <..\Originlab\grobj_utils.h>
- Find the main function wizPage2 and put the following code into it. The code is used to add a rectangle according to the xfrom and xto values assigned in page 1.
WizDlgCore* pWizCore =
	(WizDlgCore*)get_xf_core_handler(NODE_NAME_XF_WIZ_CORE_POINTER);
ASSERT(pWizCore);

// Get the x from/to values that are specified in Page 1
double xfrom, xto;
pWizCore->GetXRange(xfrom, xto);

// To get input range.
XFWizNavigation* pXFWizNavg =
	(XFWizNavigation*)(pWizCore->GetXFWizNavigation());
WizDlgInputOutputRange* pwizInputOutputRange =
	(WizDlgInputOutputRange*)(pXFWizNavg->GetXFWizInputOutputRange());

// Get input ranges from Page 1
Array<DataRange&> arrdr;
if( pwizInputOutputRange->Get(&arrdr, STR_XFNAME_PAGE_1, true) )
{
	DataRange& dr = arrdr.GetAt(0);

	vector<uint> vUIDs;
	DataPlot dp;
	if( dr.GetPlots(vUIDs) > 0 )
	{
		// Get source graph layer from input range
		dp = (DataPlot)Project.GetObject(vUIDs[0]);
		GraphLayer gl;
		dp.GetParent(gl);

		// To add rectangle to graph
		GraphObject go;
		add_rect(gl, go, xfrom, 0, xto, 0, color, 2, LN_VERTICAL,
			true, false);
	}
}
Using X-Function
Before running the example wizard, you need to create a new worksheet, fill two columns with data, and plot a line graph with two columns.
Run with wizard dialog
- Keep the graph window active. Run "wizDlg" in the Command window.
- In the dialog that appears, change the values of the xfrom and xto controls. Click the Next button.
- In the next page, change the Fill Color control to Blue.
- Click the theme button
 , choose Save As, type in theme1 as the name, and click OK.
 - Click the Finish button. The wizard dialog closes and a blue rectangle will be added to your source graph.
Run with script mode without dialog
Keep the graph window active. Run "wizDlg s:=1 t:=theme1" in the Command window. No dialog opens and a rectangle will be added to the active graph with the settings specified in the theme file.