27.7.3.5 The (Options) Miscellaneous Tab

Contents
Proxy Group
| Direct Connection |
This is the default setting. |
|---|---|
| Use System Configuration |
Use the proxy settings specified in your Windows operating system. |
| Use HTTP Proxy Server |
Use the accompanying edit box to fill in the address. If you use a proxy server that requires authentication, see FAQ-1003: Why Can't Origin Connect to the internet to Check for Updates, etc. |
Custom Dates Formats Group
This group allows you to define your own custom date formats. These custom date formats will display in the Display drop-down list when Date is selected from the Format drop-down list in the Column Properties dialog box. However, these custom date formats cannot be saved in project nor in Origin.ini. They are just diaplaied in the defined project opening by local user. When other people open this project on their computers, they will not see the same display.
When you specify a custom date format, there should be no more than 60 characters in the custom date string. "Sandwich" format strings such as TIME-DATE-TIME or DATE-TIME-DATE are not allowed.
| Type this... | To signify... | What displays in Origin |
|---|---|---|
|
M |
Month |
|
|
d |
Day |
|
|
y |
Year |
|
|
h |
Hour |
|
|
H |
Hour |
|
|
m |
Minute |
|
|
s |
Seconds |
|
|
# |
Decimal after seconds |
|
|
t |
Time marker |
|
Custom Dates Examples
To create a custom date selection that displays the format:
Saturday, September 5, 1998
type:
'dddd', 'MMM' 'd', 'yyyy'
The elements in the custom date string must be in uppercase or lowercase (for example, "MM" not "mm" for months). Elements in the custom date string may be separated by any alphanumeric character not listed above. If an element does not clearly specify how many characters should be expected on input, it must be followed by a separator enclosed in single quotes. If the element is last in the format string, the separator does not have to be in single quotes. Separators will appear in the same location in the worksheet display. However, the single quotes will not be displayed. You can not have two separators in single quotes adjacent to each other. For example, "ddd '|' '-'MMM" is forbidden.
When a space is enclosed in single quotes, it is used as a parser. This means that the data that is put in the cell must have the same number of characters between data values as are enclosed in the single quotes. If you want to add space to data that does not already have it, use unquoted separators in the custom date string. These spaces, however, will be used only for display purposes, not for parsing an input date/time string. See the following table for examples.
| Custom Date | Input | Output | Notes |
|---|---|---|---|
|
MM dd |
0416 |
04 16 |
The unquoted space was ignored by the parser. Therefore, the input was strictly according to the format. |
|
MM' 'dd |
02 12 |
02 12 |
The format expected just one space separator, but it is acceptable to have extra spaces in the string. |
|
MM' 'dd |
0212 |
-- |
A space separator was expected, so the parser failed. |
Import Group
| Default Multi-ASCII Import Template |
This combination box controls the default workbook template used when multiple ASCII files are imported into multiple workbooks. |
|---|---|
| Data Connector |
This combo list controls how the Data Connector behaves during and after the import process
|
| Exclude Imported when Saving | It controls whether save imported data when saving the workbook/project.
|
Print Group
| X Scale Factor |
This combination box value determines the X scale adjustment for printing. Modify the default value if your printer does not produce a graph with the width specified in the Width text box on the Size/Speed tab of the layer's Plot Details dialog box. For example, if you specify a width of 6 inches in the Width text box, but your graph prints 6.0625 inches wide, set the X Scale Factor combination box value to 1010, because (6.0625*1000)/6=1010. |
|---|---|
| Y Scale Factor |
This combination box value determines the Y scale adjustment for printing. Modify the default value if your printer does not produce a graph with the height specified in the Height text box on the Size/Speed tab of the layer's Plot Details dialog box. |
Additional Controls
| Use Numeric as Preferred Column Type |
This check box controls whether all columns in all new worksheets are of Numeric or of Text & Numeric type (default). If you are planning on sharing your Origin project with a colleague who has Origin 4.1, you should select this check box. Failing to do this could cause a loss in data when the project is opened in Origin 4.1. | ||
|---|---|---|---|
| Use Toolbar Spacer |
Select this check box to display a toolbar spacer below the menu bar. The toolbar spacer ensures that the toolbar area remains at a fixed width when changing the active window. The height of the toolbar spacer is determined by the maximum height required to display all the selected toolbars for any of the windows in the project (To hide the toolbar spacer, right-click in the toolbar spacer region and select Hide Toolbar Spacer from the shortcut menu). | ||
| Use Long Names When Available |
If this check box is selected, Origin will display the book and column long names, if defined, in the plot list of the Plot Setup dialog (Graph: Plot Setup); in the data list at the bottom of the Data menu; and in the left-panel of the Plot Details dialog box. | ||
| Display Bitmaps in Menus |
This check box controls whether or not bitmaps display next to menu commands. Menu commands that have toolbar button access have bitmaps that display to the left of the command.
| ||
| Auto Update Page Short Name to Follow Long Name |
If this check box is selected, Origin will automatically change the Short Name of a page, such as a workbook, to follow the Long Name. The Long Name might be truncated and the special characters in it might be removed so as to create a valid, equivalent Short Name. | ||
| Enable Collapsible Menus |
Main and context menus in Origin are collapsed by default. Use the check box to turn it on/off. To learn more about collapsible menu, please refer to the FAQ item |

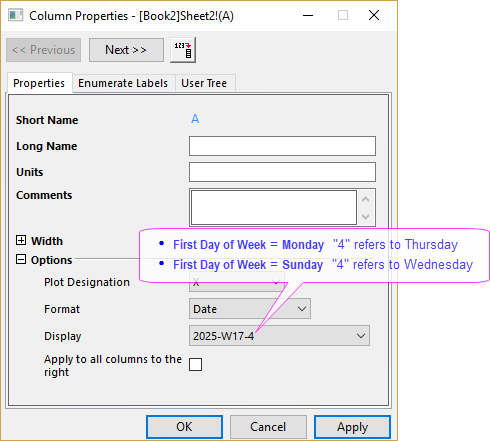
First Day of Week
Specify the first day of a week, which is used in Date format displaying yyyy-Www-D.