8.3.4.1 Adding one Layer using Insert New Layer menu

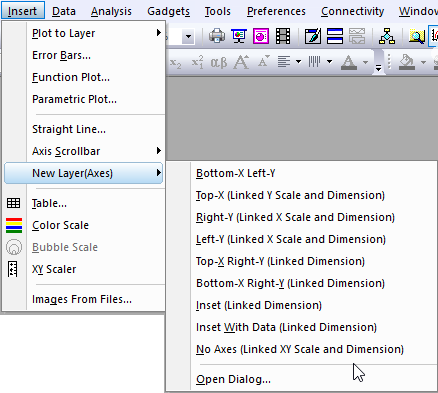
If you want to add one more layer into current graph window, you can select Insert: New Layer(Axes): ### menu to add a new layer with desired axes.

Insert Layer Menu.png

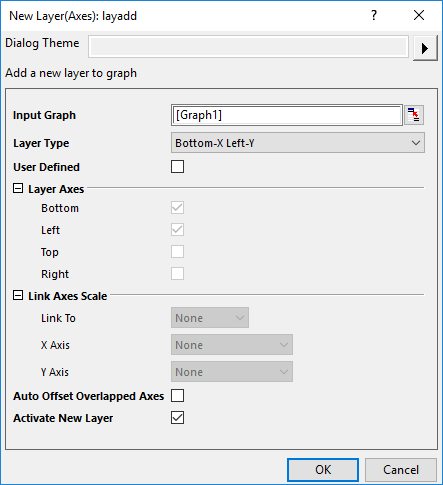
This tutorial will teach you how to add one more layer into current graph window by the X-Function layadd:

  1. New a workbook, import the file <Origin folder>\Samples\Graphing\Linked Layers 1.dat.
  2. Highlight col(A) and col(B) to plot a line graph. Now, we are going to add a new layer with a linked top-X and un-linked right-Y axes which have same dimension with the original graph layer.
  3. Select Insert: New Layer(Axes): Open dialog... to open the New Layer(Axes):layadd dialog. In the dialog, check the User Defined check box to add a new layer with user-defined axes.
  4. Under Layer Axes branch, check Top and Right to add Top-X and right-Y for the new layer; Under Linked Axes Scale branch, set Link To to Layer1, set X Axis to Straight(1 to 1). Please note, if the new layer has same axes as Layer1, such as bottom-X or Left Y, the axes will be overlapped. In this case, you can check the Auto Offset Overlapped Axes check to set the overlapped axes be arranged with appropriate offset.
  5. Keep the check box Activate New Layer checked. Click OK button to add the new layer.
  6. Activate the Original workbook, highlight Col(G), then activate the graph again, select Insert: Plot to Layer: Scatter to add the data "PCBs" into the newly-added layer.

Once you have added a new layer into current graph, you can double-click on the new layer to open Plot Details dialog to check the linking status in the Link Axes Scales tab.

Origin provides Common Display controls for applying customizations made to a single graph layer, to selected layers in a multi-layer graph. By default, added layers are excluded from such group customizations. For more information, see Common Display.